Nail Clipping, Ear Cleaning, & Baths
Clipping a Dog's Nails
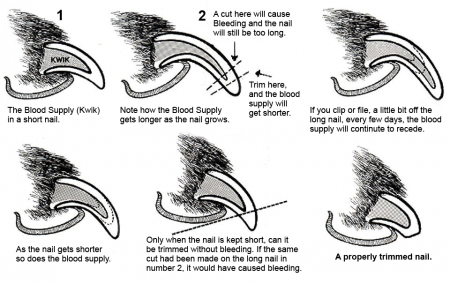
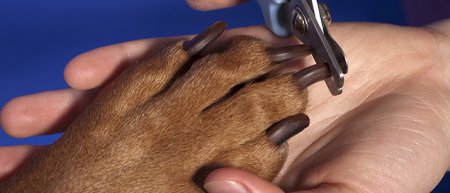
The first step is to get some treats, make the whole experience positive and don’t feel like you need to be a hero and trim all the nails at once. Start with one, reward and come back later if you or your pet is nervous. One technique that helps is to hold the handle of the nail trimmers flat against the toe pad and cut straight across the nail, so that the nail will sit just above the ground. This technique makes it extremely unlikely you will cut the nails too short.
To get a shorter cut than the previous method, aim to cut at a 45° angle, after visualising the quick. The quick is the pink area within the nail where the nerves and blood vessels are, similar to the area underneath our nails.
WORKING WITH BLACK NAILS
If your dog has black nails, look at the underside of the nail and you will notice that towards the tip the nail separates out into a triangular shape with two outer ‘walls’. At this point, there is no quick and it is safe to cut the tip off. Otherwise use the technique of simply cutting straight across from the pad, rather than attempting to cut up at a 45° angle. Another trick of the trade is to apply gentle pressure with the nail trimmers without actually cutting where you think you need to cut. If your dog reacts to the pressure, most likely you are too close to the quick and you will need to more the clippers further down the nail.
WHAT IF I MAKE THE NAILS BLEED?
If you accidentally cut the nails too short you can use styptic powder, or simply use a clean bar of soap and run it under the damaged nail. The soap will plug the vessel and stop the bleeding. Usually if you have made your dog bleed, they will be a bit nervous next time, so make sure you have lots of treats at the ready and take it slow. If you pet is nervous about nail trimming, view this video on how to counter condition your dog and get him used to nail trims.
OLD DOGS OR DEFORMED NAILS
Older dogs tend to end up with long quicks, elongated nails and often extremely hard nails. Nails can also grow back a bit deformed if there has been some sort of trauma to the nail bed, such as when the dew claw has been caught in something and torn.
Clipping after bathing can help with the hardness issue, as they nails will be softer. Ensuring you just take the tips off the nails or cut them so they sit just above the floor when your dog is standing can help to ensure you don’t cut deformed nails too short.
Alternatively, if you gradually take the tips off, you can often make the quick recede a little over time, but you will need to be patient. So long as your dog’s nails are not touching the ground, getting caught in anything and causing the toes to splay out or bend, there is no need to worry too much about keeping them extremely short.
Whenever you trim your dog’s nails remember to make the whole experience rewarding by having treats at the ready and always take a little bit at a time if you can’t clearly see the quick beneath the nail. And if you have a very patient dog, why not paint those nails!
Cleaning His Ears
Just before you give a dog a bath, you should clean his ears.
Make it positive
Unless you want a squirmy pooch that makes the process a lot more difficult — and take a lot longer — it’s important to bring your dog along slowly and associate ear-cleaning with something positive. One tried-and-true method is to have a bag of treats ready to offer each time that your dog cooperates during the process.
Get the right tools
Just like with human ears, you never want to use cotton swabs because they can hurt your dog’s ears. Instead, have a bag of cotton balls ready, or wrap your finger in gauze and use it. You might want to use gloves for the cleaning, but it’s also okay to just wash your hands if no gloves are available. Perhaps the most important tool, though, is the ear rinse. You want one that’s completely safe for your dog but still able to get the job done. Look for a product which contains no antibiotics, steroids, alcohol, or toxic materials of any kind.
Put everything within reach
The last thing you want when trying to clean your dog’s ears is to discover halfway through the process that you forgot something and have to get up to find it. Do this and you’ll likely find yourself needing to wrangle your dog back into position and possibly even having to start the whole process over.
Follow the rules
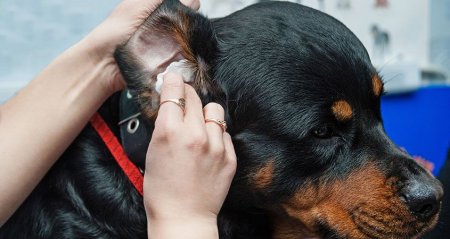
To clean your dog’s ears without causing harm, you want to start on the outside and work your way in — but only until you start to feel resistance. If you try to push further in, you can damage your dog’s ear, so err on the side of caution. Wet a cotton ball with ear rinse and wipe the part of the ear that you can easily see, the outer flap. Then wet a new cotton ball to clean the inner ear. Ideally, you want to do this about once a week.
If the cotton balls or gauze are especially dirty, you may want to think about scheduling an appointment with your dog’s vet to make sure everything is okay. And don’t forget to give your pup lots of affection and treats when you’re done!
Giving Him a Bath
First, one of the most important steps of bathing is to get the dog completely wet before applying the shampoo. Two reasons for this are:
The shampoo forms suds and distributes more easily.
If you are not getting the entire dog wet, it is doubtful that you will get the entire dog shampooed thoroughly, and then you will still have a dirty dog with clean spots instead of a clean dog.
Secondly, be very careful not to spray water into the dog's nose and ears. Hold the dog's muzzle so that the nose points at the floor of the bathtub and position the sprayer above the head. This will ensure that you can saturate your dog's face face without getting water up his nose and ears. As a further precaution, you can also hold the ear flaps down with your thumb and first finger as you point the nose down.
Thirdly, turn your pet around in the bathtub while you are working on him to ensure that you are getting both sides wet, shampooed, and rinsed. It is easier to work on the sections of your pet that you can see rather than assuming you can do it without looking.
When applying the shampoo, use as much as necessary to achieve a good lather (some lather more easily than others). Apply it to several areas of the body and then work it in with more water from the hand shower. If you have one, use a rubber curry comb to get the shampoo through the hair down to the skin. Rubber curry combs are especially effective for dogs with extremely short hair (pit bulls, labs) or extremely thick hair (Akitas, huskies). The bath is a great time for bonding with your pet. Rubbing the shampoo thoroughly through the hair is a great excuse to give a nice massage at the same time. Elderly and disabled pets will greatly appreciate this comforting touch, and any normal dog will love the extra rubdown too.
Now while your pet is all sudsed up, it is time to pay attention to the areas around the eyes and the anus. Work on the eyes first, using your flea comb or toothbrush to remove any eye boogers. Then then move to the anus, using the same tools removing any real matter. Do not do this in reverse order. You don’t want to accidentally carry fecal matter to your dog’s eyes.
Never yank and pull. Soften any foreign matter with shampoo and water, and comb gently until you have removed it. If you know how and want to express the anal gland, this is the best time to do that. Many animals experience much relief after having their glands done and, although a stinky chore, it is definitely a part of your pet's health that shouldn't be ignored. Small dogs suffer more from anal gland problems—including impaction, explosion, and, subsequently, infection—than larger breeds. If your dog has been scooting around on its butt, it's not worms, but an anal gland problem that is ailing your friend.
Next, rinse well and then apply the shampoo all over again. Reapplying the shampoo is very important to getting a pet really clean. Think of the shampoo as a bunch of little shovels. Each shovel full will only remove so much dirt. When you take the time to do a second shampooing, all those little shovels remove an extra shovel full of dirt and ensure that the pet is squeaky clean. This is especially true if your pet started out extra dirty. Don't be afraid to use more than one type of shampoo during this process. A good rule of thumb is to use a good cleaning shampoo first and your medical, oatmeal, or conditioning shampoo second. Don't forget to read the label on each one for directions as to how long it should be left on the skin and coat to be effective.
The last step of the bath is to rinse and rinse and then rinse some more. It is crucial that you rinse all of the shampoo off of the skin and coat. Shampoo left in the coat is the number one cause of itching, hot spots, and supposed allergies. Look at the water coming off of the dog as you are rinsing. If it is suds free and looks like clear water, not discolored at all, you have probably rinsed correctly. Clear water draining off of the dog during the rinse is also an indication that you did in fact remove all of the dirt from the dog. Do not forget to keep watching the water as you recheck hard-to-reach areas such as armpits, the anus, the groin, and the face. When you are satisfied that your dog is clean and has been rinsed well, finish by gently squeegee-ing the water from your pet. Finish off by towel-drying your pet using a pat-and-squeeze method, never a vigorous back-and-forth rubbing unless your dog is short-haired. On long-haired breeds, this will help you avoid matting the hair by accident.


